Unity: How to Set Up Sprites for Consistent UI Scaling.
We were recently adding some new UI elements to our space-shooter game and found out about a cool feature in the Unity sprite editor for sprites you plan on using in your UI, especially anything you want to have a border and/or distinctive corners. Up until we found out about this functionality we were wondering how we were going to get the borders and corners of our UI to look consistent at different sizes. Making a separate sprite for each UI element so it would match our pixel-per-unit ratio didn’t sound like a great solution. Fortunately John knew about this Unity UI series on YouTube. Although it was made using an older version of Unity, the core principles covered in the series are very useful and still applicable. After seeing this done in this video series we tried it ourselves and it is remarkably simple. After bringing it up with other devs we talk with, people seemed surprised to learn about it, so I figured it would be worth writing a post about.
Before I get started, here is what we ended up with for our in-game “HUD” at the top of the screen:
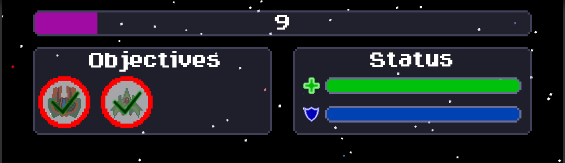
The outline on the bar at the top, the borders for the “Objectives” and “Status” boxes, as well as the outline for the health and shield bars are all one sprite. The border thickness as well as the rounded corners are the same regardless of scaling.
First I’ll show what UI scaling looks like without first setting up your sprites properly:
As you can see, the thickness of the border and the appearance of the corners stretches and compresses and ruins the aesthetic of the box.
In order to fix this, find your imported sprite in your Project Hierarchy, click it, then click Sprite Editor in the inspector. Make sure your sprite is clicked in the sprite editor so you can see the blue “pivot” dot in the middle. Then, grab the green lines on the sides and top and bottom of your sprite and move them in. See the image below for reference, and then I’ll explain what exactly is going on here.
In the UI world this is called 9-slicing or nine-slicing. I already knew these lines could be moved in the sprite editor, but until we learned about this I assumed it was some way of resizing or cropping a sprite, so I never did it. What’s actually happening here is you are telling Unity some things about your sprite: Whatever is outside the lines in the corners will be kept the same size, whatever is outside the lines on the sides as well as the top and bottom will be stretched only along the proper axis (x axis for top and bottom, y axis for the sides) and whatever is in the middle will just be stretched (or tiled depending on how you set it up in the scene).
To see this in action, put your sprite in the scene, select it, go to the inspector and change the Draw Mode to Sliced on the Sprite Renderer. If you have a repeating texture or pattern in the middle of your UI sprite, you can set Draw Mode to Tiled and it will tile that pattern in the center of the sprite, rather than stretch it. In this demo, I just have a solid color in the middle, so Sliced mode is fine. Compare the graphic below to the first example of scaling in the graphic above to see how much more consistent it is:
The thickness of the border and the shape and size of the rounded edges on the corners stay consistent no matter how I scale the sprite. This really helped simplify the way we do our UI and I hope others find it useful. If you’d like the simple pixel-art style sprite I used for this demo, you can get it here.
Thanks for reading!